Although I use On1 routinely for most of my editing, I so far haven’t really mentioned it to any great degreeon this blog, even though most of the images you see here will have been processed using On1. I’m therefore going to take this opportunity to put this right today.
This hugely competent editor from OnOne is a full featured editor available for both Windows and MAC. It combines comprehensive RAW editing with the ability to use a huge number of Presets and LUT’s with a fully integrated layer management system. It also includes a very usable Digital Asset Management system (DAM) for those that want to apply keywords and descriptions to their images and to manage image locations, albums and virtual copies etc. This now includes the ability to find and delete duplicates as well as group your images more efficiently. Albums are hugely useful in that they help you to group images across multiple directories. For example you could create an album called Reflections and include any image within that album that includes a reflection of some kind irrespective of in which directory that image is sitting. Albums can be any size so no limit to the number of images you can add. I use them extensively.
ON1 offers a single user interface and recent improvements include the ability to work on and improve your portraits without having to leave ON1 to go to something like PortraitPro. This now includes Frequency Seperation of a sort plus the ability to relight the face and improve the eyes, skin and mouth. These can be applied together or independently. For male portraits I tend to just work on the eyes bit for female portraits, it’s not unusual to use all three. This feature, although releatively new but has a lot of potential. At present it does exclude a lot of the functionaly you will find in products such as PortraitPro but nonetheless, it is very usable and the results can be great.It still falls way short of PortraitPro and Affinity in this respect but it’s a good step forward.
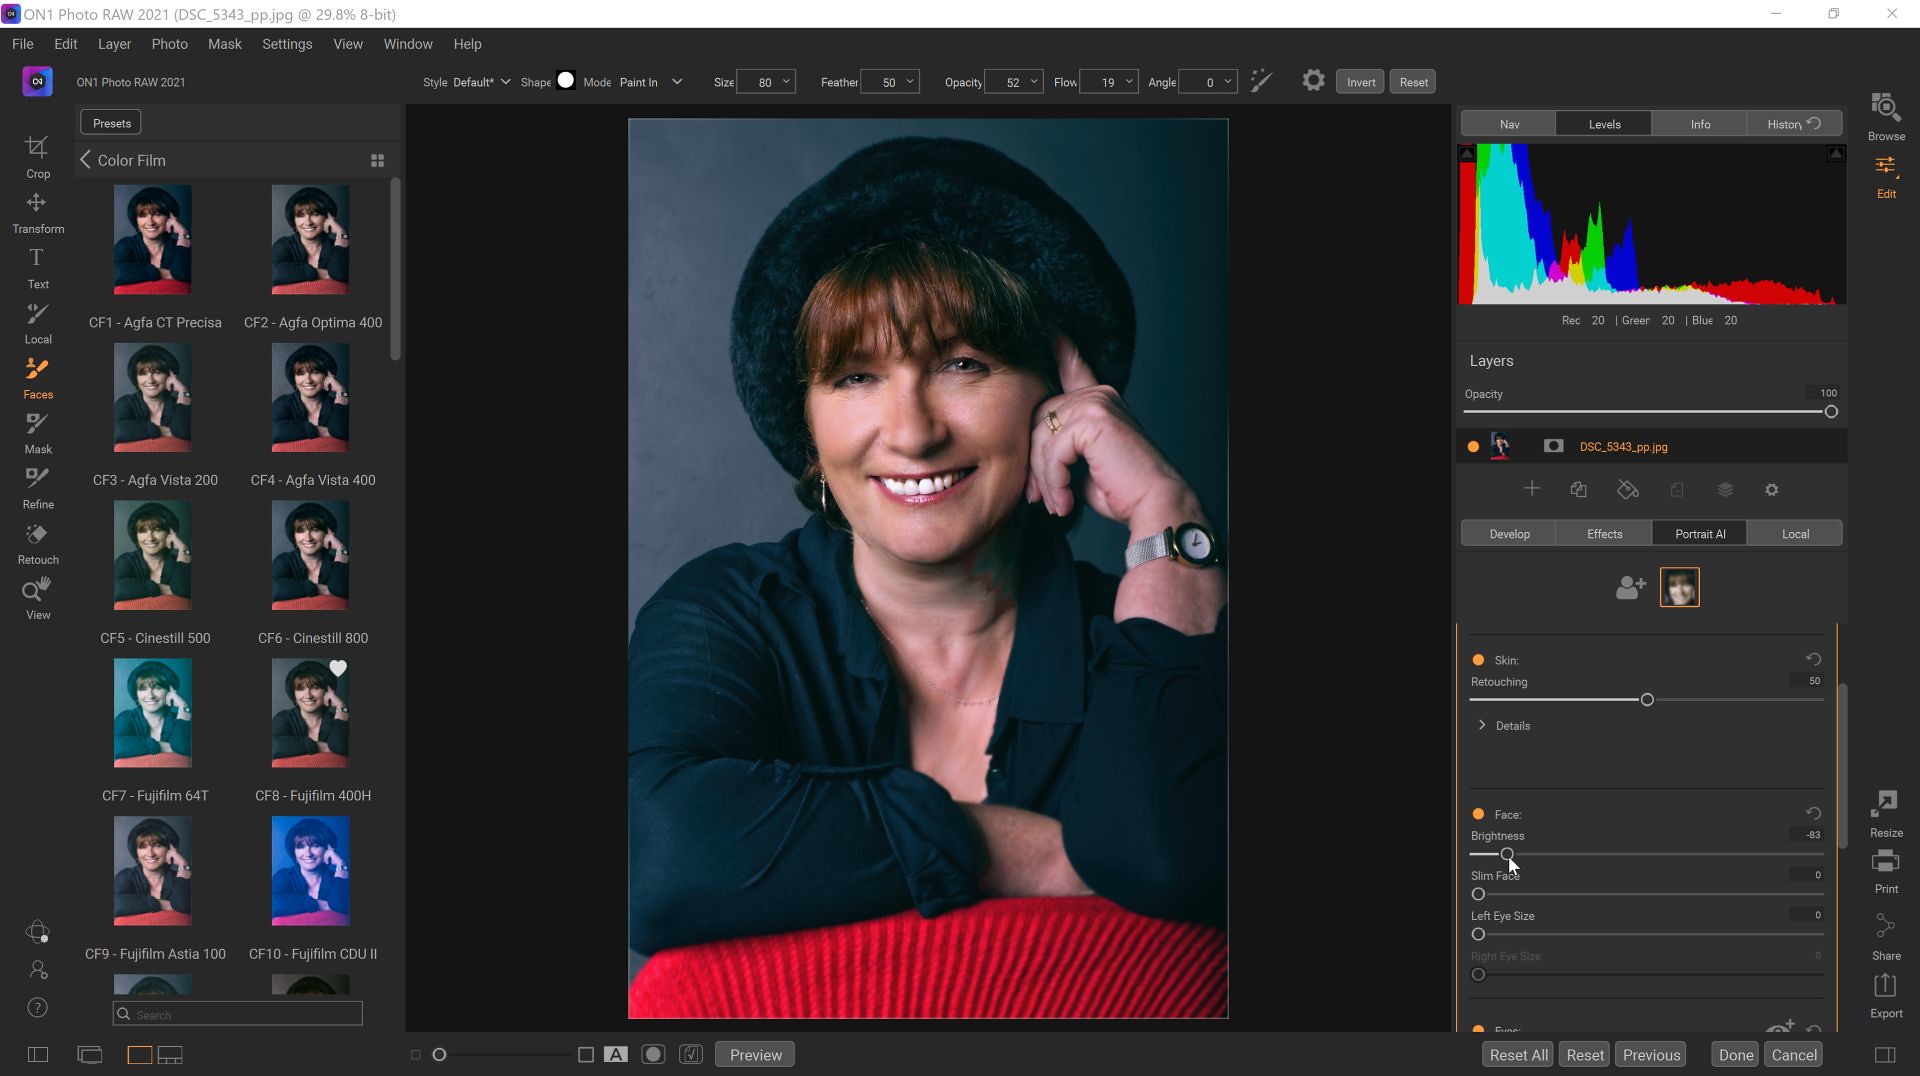
The On1 interface is relatively simple to get to grips with with various panels providing information to the left and right of the main editing panel. The left-hand panel can be minimised to provide additional real-estate to allow you to focus on your editing in the centre panel. The right-hand panel contains all the features you need to create amazing post-processed results, often in just a few minutes.
If you need to add layers, ON1 has all of the features you need access to plus as mentioned, you can create a virtual copy at any time to branch into a different editing approach if needed. The results from ON1 are exceptional thanks in part to the ability to use a vast number of presets and LUT’s which take out the heavy lifting and help you create a particual look, for example an analogue film look, black and white images etc etc.
What I like particularly about ON1 is the Effects Panel. This gives you instant access to a number of features including B&W converison, Vignette, Colour and Tone Controls, Contrast Controls and much more. Each these controls in turn have a number of presets you can choose from or, if you prefer, you can edit manually using the sliders. This makes editing RAW files effortless for the most part, especially if you are doing a straight edit.
Another good feature is the ability to create your own presets. For example, recently I wanted to convert some digitised images taken from film negatives so I fully edited one from the batch to exactly how I wanted it, then created a preset which I then applied to the other 35 images in the set. While there was still a need to do some very minor adjustments, for example to exposure because of the changing light conditions, this vastly reduced the amount of effort needed to convert and grade each negative.

The final option availble during editing is Local Adjustments which is basically where you do the your fine tuning of your image. This provides you with a huge range of possibilities including the creation of complex masks. When using local adjustments the tool set on the LHS of the screen has several additional tools that can be used to help in the creation and refining of masks. Depending on the complexity of the object being masked, this process can take anything from a few seconds to a few minutes. The quality of your mask ultimately controls the quality of the resulting images so time taken on mask creation is time well spent.

As mentioned earlier, ON1 allows you to work with images to create composites such a changing a sky on one image for another or adding a texture or background image. Each layer can have it’s own adjustments and effects so it’s possible to create quite complex composite images using this technique. Here, I’ve simply removed the backround of the main portrait and substituted this for a textured background to give more dynamic appeal.

The latest version of On1 Photo Raw 2021 now also works as a plugin to Affinity Photo. When installing On1, if Affinity Photo is loaded on your computer the necessary plugin files are automatically loaded. Plugin files also exist for Adobe Photoshop and again, if On1 locates Photoshop on your PC, it automatically loads the necessary files. Why is this so useful? Well, Affinity Photo is a comparible editor to Photoshop in that it can do pretty much anything that Photoshop can do. The main difference between the two is that Affinity Photo is sold on a perpetual licence, this is currently under £30 (as of 26/03/2021) whereas Adobe Photoshop is sold alongside Adobe Lightroom and Bridge for about £10 per month. That means combining On1 Photo Raw 2021, which I bought for under £50 and Affinity Photo at just £25 equates to an immediate saving of about £45 in the first year. Thereafter, even renewing On1 yearly means more and more savings year on year. Will you notice the difference other than in your pocket? If you are a proficient Photoshop user then probably, there are a lot of presets only available to Photoshop. If you have never used Lightroom or Photoshop, probably not, the functionality of On1 + Affinity Photo matches the Adobe products pretty much feature to feature. I personally have never felt I was losing out by not using Photoshop although there have been times when I have seen 3rd party add-ons that are only available to Photoshop users and I have felt a little disappointed. Then I think how much I have saved and the world’s OK again!
PROS
- Comprehensive image editing
- Now works as a plugin to Affinity Photo as well as Photoshop
- Perpetual licence – buy once and only upgrade if you feel you need to
- Reasonable cost – often much less than £90 normal price (currently it’s just £58 plus you can often apply vouchers)
- Relatively quick learning curve
- Create virtual copies to work on
- Layer based editing system with the ability to add effects and do local adjustments
- Portraiture Features
- A huge number of LUTS and Presets are available to help you create stunning images
- Comprehensive print and print layout options
CONS
- Can be slow to load and export images
- Some lag noticable when masking / adjusting images
- Mask refinement while good is not perfect
- Layers are limted to image layers (although you can duplicate layers)
- UI is busy but well layed out and easy to navigate
ON1: This helpful and complete guide to using ON1 PhotoRaw 2020 is a great reference document for anyone using, or thinking about using ON1 as their primary editor. Find it here.